Thursday, December 3, 2009

I like little bundts and I can not lie!


I went out to cut some pine bows and dogwood branches for my holiday decorating and popped in to see my Mom. She sent me home with a new Ina Garten cookbook,  a spring form tube pan, a fluted pie plate (I think) and a mini bundt cake pan. I knew immediately I wanted to play with the mini bundt cake pan. I decided these would be wildly popular at the Red Mug so brought it to work. I wasn't doing the cooking and baking today but my co-worker Anna was happy to try out the recipe that was originally from Martha Stewart.

I would love to say I know first hand how delicious these were but I can't,  they all sold in a matter of an hour. A huge success. I did ask a few of my customers how they liked them and they said they loved them and thought we should offer them again. Who could resist their very own little bundt cake! So not only do I like big bundts, I like little bundts too! Hurry, go buy a mini bundt cake pan!


 Little Almond Bundt Cakes

Makes 6
10 tablespoons unsalted butter, room temperature, plus more for pans
6 tablespoons sliced almonds
1/3 cup coarsely chopped almonds
5 tablespoons packed light-brown sugar
1 teaspoon ground cinnamon
1/8 teaspoon freshly grated nutmeg
1 1/2 cups all-purpose flour
1 teaspoon baking powder
1/2 teaspoon baking soda
1/4 teaspoon salt
3/4 cup granulated sugar
1 large egg
1 tablespoon pure vanilla extract
3/4 cup sour cream, or plain yogur
2 cups sifted confectioners' sugar
3 to 4 tablespoons milk

Directions:
Preheat oven to 350 degrees. Generously butter six mini Bundt pans; set aside. Spread sliced almonds out on a baking pan, and toast until golden brown. Transfer nuts to a bowl to cool. In a medium bowl, combine chopped almonds, light-brown sugar, cinnamon, and nutmeg; set aside. In another medium bowl, sift together flour, baking powder, baking soda, and salt; set aside.
In the bowl of an electric mixer, combine 6 tablespoons butter and granulated sugar. Beat on medium speed until light and fluffy, about 3 minutes. Add egg; beat until combined. Add 1 teaspoon vanilla, and beat until smooth. Add 1/3 of reserved flour mixture and half of sour cream; beat to combine. Repeat. Add final third of flour mixture, and beat to combine.

Fill each Bundt pan with 3 tablespoons batter, and spread evenly with a small offset spatula or spoon. Sprinkle each with 2 tablespoons of reserved almond-spice mixture. Top with additional 3 tablespoons batter; the batter should come to within 1/2 inch of the rims of the pans.

Bake until cakes are golden brown and a cake tester inserted into the center comes out clean, about 20 minutes. Transfer cakes to a wire rack to cool completely. Unmold cakes. Place cakes, flat sides down, on a wire rack placed over a baking pan.

Melt remaining 4 tablespoons butter over medium-high heat until color turns nut brown, about 5 minutes. Pour butter into a medium bowl, leaving behind any dark sediment. Stir in confectioners’ sugar, remaining 2 teaspoons vanilla, and 3 tablespoons milk until smooth; add an additional tablespoon milk, if necessary, so glaze is pourable. Drizzle glaze over cakes, and sprinkle with toasted almonds. Serve.

Wednesday, December 2, 2009

Coconut Macaroons


Okay, these are SO GOOD. I love coconut and these are full of coconut, The hardest thing about making these cookies was figuring out how many cups of coconut is equal to 14 oz. I tried to make these to sell at Red Mug today but had no idea how to convert the 14 ounces of coconut to cups as I had 10 pounds of coconut that I was dealing with not a 14 oz bag. So when all else fails you GOOGLE IT. Well I'm glad I didn't rely on the answer I found online because I found a site that said it was 1.75 cups. It didn't sound right to me, I ran to the store and bought a 14 oz package of coconut and right on the front of the package it says it is 5 1/3 cups. Well, here is the recipe I found in another new cookbook by Ina Garten. if you have a sweet tooth and you love coconut you will be glad you made them.


COCONUT MACAROONS

14 ounce package of sweetened shredded coconut
14 ounce can of sweetened condensed milk
1 t. pure vanilla extract
2 extra-large eg whites, at room temperature
1/4 t. kosher salt

Preheat oven to 350 degrees. Combine the coconut, condensed milk, and vanilla in a large bowl and set aside. In separate bowl whip the egg whites and salt on high speed until they make medium firm peaks. Carefully fold the egg whites into the coconut mixture.

Drop the batter onto sheet pans lined with parchment paper using about a tablespoon of mix. Bake for 25- 30 minutes until golden brown. Cool and serve (yeah right...I popped one in my mouth and burnt my mouth but it was so worth it!) The skin on the roof of your mouth is overrated.

These cookies stay fresh for a few days if wrapped well and left at room temperature. Makes 20-22 cookies.

Monday, November 30, 2009

Butternut Squash Lasagna


I wish I could tell you I haven't been doing much cooking or baking and that is the reason I haven't posted anything but that would be a lie. I have been cooking and baking and EATING like mad. My only excuse is that I have a short attention span and easily get bored. Since Fall has arrived I have been cooking and baking like crazy with pumpkin and squash.  I found a recipe that sounded really good in a Cooking Light magazine and although I managed to completely screw up the recipe because of my short attention span it turned out deliciously. If you like the idea of a vegetarian lasagna and like squash and spinach I encourage you to try it. If you don't follow the instructions closely no worries. I assembled the lasagna almost totally wrong and it still came out wonderful.


Butternut Squash Lasagna
adapted from Cooking Light


Ingredients

  • Cooking spray
  • 3  cups  chopped onion
  • 10  cup  fresh spinach
  • 3/4  cup  (3 ounces) shredded sharp provolone cheese
  • 1/2  cup  chopped fresh flat-leaf parsley
  • 1  teaspoon  salt
  • 1/2  teaspoon  freshly ground black pepper
  • 2  large eggs
  • 1  (15-ounce) carton part-skim ricotta cheese
  • 1  (15-ounce) carton fat-free ricotta cheese
  • 3  cups  diced peeled butternut squash
  • 6  cups smoky marina sauce (recipe below)
  • 12  oven-ready lasagna noodles (such as Barilla)
  • 1  cup  (4 ounces) grated fresh Parmesan cheese
Preperation 

Preheat oven to 375°.
Heat a large Dutch oven coated with cooking spray over medium-high heat. Add onion; sauté 4 minutes or until tender. Add spinach; sauté 1 1/2 minutes or until spinach wilts. Combine provolone, parsley, salt, pepper, eggs, and ricotta cheeses in a large bowl.

Place squash in a microwave-safe bowl. Cover and cook on high 5 minutes or until tender.

Coat the bottom and sides of a 9X13 baking dish with cooking spray. Spread 1 cup Smoky Marinara in the bottom of prepared dish. Arrange 4 noodles over sauce; spread 2 cup's of cheese mixture over noodles. Arrange squash over cheese mixture; spread 1 1/2 cups sauce over squash.
Arrange 4 noodles over sauce; spread 2 cups cheese mixture over the noodles. Arrange 3 cups onion mixture over cheese mixture; spread 1 1/2  cups sauce over spinach mixture.

Arrange 4 noodles over sauce; spread 2 cups Smoky Marinara evenly over noodles. Sprinkle with 1 cup Parmesan. Cover each pan with foil.

Bake at 375° for 30 minutes. Uncover and bake an additional 30 minutes.

Now I already told you I messed up the layers of this. But if you've ever made lasagna I think you probably know it doesn't make much difference as long as you end up with cheese or something on the top layer.


Smoky Marinara Sauce

Yield: 6 cups (serving size: 1/2 cup)

Ingredients

  • 1  tablespoon  olive oil
  • 3  garlic cloves, minced
  • 1/4  cup  chopped fresh basil
  • 2  tablespoons  chopped fresh parsley
  • 2  tablespoons  chopped fresh or 2 teaspoons dried oregano
  • 2  teaspoons  balsamic vinegar
  • 1/8  teaspoon  salt
  • 1/8  teaspoon  pepper
  • 1  (28-ounce) can crushed fire-roasted tomatoes, undrained (I used diced)
  • 1  (28-ounce) can crushed tomatoes, undrained

Preparation

Heat oil in a large saucepan over medium heat. Add garlic, basil, parsley, and oregano; sauté 1 minute, stirring frequently. Stir in vinegar and remaining ingredients. Reduce heat, and simmer 10 minutes. You'll end up with extra of this so if you would rather use smaller cans of tomatoes and adjust seasoning you can do that or you can save and use the remaining marinara within a few days or freeze.


Saturday, October 24, 2009

The Perfect Meat Loaf


I love meat loaf. Wait, I love this meatloaf. It comes from a cookbook called The Perfect Recipe by Pam Anderson(not the untalented bimbo) This is a Bacon Wrapped Meat Loaf with Brown Sugar-Ketchup Glaze. Its juicy and flavorful and did I mention I love it? And in my opinion anything with bacon  is better than without it.


Bacon-Wrapped Meat Loaf w/ Brown Sugar Ketchup Glaze

Brown-Sugar Ketchup Glaze
1/4 cup ketchup or chili sauce
2 T. brown sugar (light or dark)
2 t. cider or white vinegar

Meat Loaf
2 t. vegetable oil
1 medium onion chopped
2 garlic cloves, minced
2 eggs
1 t dried thyme leaves
1 t salt
1/2 t pepper
2 t Dijon mustard
2 t Worcestershire sauce
1/4 teaspoon hot sauce
1/2 c buttermilk or plain yogurt
2 pounds meat loaf mix (ground chuck, ground veal, ground pork)
I can't find that mixture so I just use 1 1/2 pounds beef and 1/2 pound pork
2/3 cup crushed saltine crackers or quick oatmeal or 1 1/3 c fresh bread crumbs
1/3 c minced fresh parsley leaves
8-9 ounces thin-sliced bacon

Glaze: Mix all ingredients in a small bowl and set aside.

Meat Loaf: Preheat oven to 350. Heat oil in medium skillet. Add onion and garlic, saute' until softened, about 5 minutes; set aside to cool.

Mix eggs with thyme, salt, pepper, mustard, Worcestershire, pepper sauce and milk or yogurt. Add egg mixture to meat in a large bowl, along with crackers, oatmeal or bread crumbs, parsley and cooked onion mixture; mix with a fork until evenly blended.

Shape the meat mixture into a loaf about 9x5 inches. Cover a wire rack with foil; prick the foil several times with a fork. Place on a shallow roasting pan (jelly roll pan works well) set formed meat loaf on rack. Brush with all of the glaze, then arrange bacon slices crosswise over loaf, overlapping them slightly and tucking them under the loaf to prevent them from curling.

Bake this little sweetheart until bacon is crisp and loaf registers 160 degrees; about 1 hour. Cool for at least 20 minutes. Slice and serve.

Threes A Charm for Ebleskiver

Ebleskiver are delicious and once you get the hang of making them they are well worth the trouble. I bought a vintage Ebleskiver pan but I bet a non stick version would make these quite easy to prepare. Some of you may never have heard of Ebleskiver, in truth I hadn't either until I spotted the pan in Williams Sonoma. I wanted to do some homework on these spheres of awesomeness. Here is what I was able to find. I found they are also spelled Aebleskiver. They are a delicacy, supposedly invented by some Dane back in history. They are like a pancake formed like a tennis ball.

The name makes people believe that there are slices of apples inside, which is correct--- if you put apple slices inside! You see, everybody, including me, has their own favorite recipe and way of serving them, all depending from where in Denmark the recipe came from. You can find them served several different ways. The most common way is with powdered sugar sprinkled over them and then topped with raspberry jam. One theory how Aebleskiver were invented is that back in the good old days, when the Vikings were roaming up and down the coasts of Europe and the waters of the Atlantic, one band of these Vikings had been particularly hard hit in battle, so, when they got back on their ship with their horn helmets and shields all dented and banged up, they decided to have one of their favorite dishes to help them regain their strength ---- pancakes!!

In those days they did not have modern conveniences such as frying pans, so, they greased their shields and poured the pancake batter on them over the fire but, guess what?! Aebleskiver!

Danish Ebleskiver

2 cups buttermilk
2 cups flour
3 eggs
1 tsp baking powder
1/2 tsp salt
1 tsp baking soda
2 T sugar
desired fruit jam or applesauce
butter

Separate eggs, beat whites until they are stiff, set aside. In another bowl beat yolks, add sugar and buttermilk
Sift together the flour, baking soda, baking powder and salt. Then add to egg yolk mixture. Mix well. Fold in stiffly beaten egg whites.
Heat ebleskiver pan and put small dot of butter in each depression. When bubbling add batter to 2/3 full working quickly put small amount of filling in each, go back and cover with more batter(small amount) when they are set carefully turn with a fork or spoon or I found a frosting spatula worked well.
Serve with powdered sugar, jam, maple syrup or whatever you would like!

This recipe makes a lot of these (at least 28) plenty of batter to practice with.


Ebleskiver Take 2


I figured out you have to work really fast. You fill each depression with a little bit of butter, wait for it bubble and then fill with batter 2/3 full. Quickly starting with the first one add filling. This time I used some Peach preserves. Then you go back and add a small amount of batter to the tops. By the time you finish that step the first little bugger should be ready to flip. Not an easy task either. I will admit that as I worked my way around the pan it did get easier. They are looking better but still not perfect.

Ebleskiver Shows Me Whats Up

Take 1


Ok. Making Ebleskiver is hard. My first attempt didn't go so well. I think my pan was too hot. These I made with a buttermilk recipe I found online and filled them with my homemade applesauce. My Danish Great Great grandmother would be ashamed of me. I will try again.

Pumpkin Chocolate Chip Muffins


These Pumpkin Chocolate Chip Muffins are pretty healthy as muffins go. These are not real sweet, they are made with the addition of whole wheat flour and flaxseed meal, both of which I buy Bobs Red Mill brand. I love them and can feel good about eating a second one...and a third.


Pumpkin Chocolate Chip Muffins
(makes 12)

Combine:
1 cup canned pumpkin (not pie filling)
2 eggs
1/2 c. brown sugar
1/2 c. nonfat milk
1/3 c. canola oil
1 tsp. vanilla

Add to the wet mixture a mixture of:

1 cup white flour
1/2 cup wheat flour
1/4 ground flaxseed meal
2 tsp. baking powder
1/2 tsp. cinnamon
1/4 tsp/ salt
1/2 c. Hershey's mini chocolate chips

Bake at 350 for about 12 minutes. I personally am not a fan of paper muffin cups so I just sprayed the pan with PAM for baking. I filled the muffin tins probably 3/4 full. Perfect!

I like big Bundts and I can not lie!


I love Fall it is my favorite time of the year. The flies and mosquitoes are nearly dead and it cools down so I can comfortably and happily cover my sad body. Pumpkin is everywhere and I love to cook and bake with it. This Pumpkin Bundt is my favorite of many bundt recipes I have. Give it a whirl you wont be sorry!


I like big Bundts Pumpkin Bundt

For cake

1 1/2 sticks (3/4 cup) unsalted butter, softened, plus additional for greasing bundt pan
2 1/4 cups all-purpose flour plus additional for dusting pan
2 teaspoons baking powder
1 teaspoon baking soda
1 teaspoon cinnamon
3/4 teaspoon ground allspice
1/2 teaspoon salt
1 1/4 cups canned solid-pack pumpkin (from a 15-ounce can; not pie filling)
3/4 cup well-shaken buttermilk
1 teaspoon vanilla
1 1/4 cups granulated sugar
3 large eggs


For icing
2 tablespoons plus 2 teaspoons well-shaken buttermilk
1 1/2 cups confectioners sugar

Special equipment: a 10-inch nonstick bundt pan (3 quart)

Make cake:
Put oven rack to middle position and preheat oven to 350°F. Butter bundt pan generously, then dust with flour, knocking out excess.

Whisk together flour, baking powder, baking soda, cinnamon, allspice, and salt in a bowl. Whisk together pumpkin, 3/4 cup buttermilk, and vanilla in another bowl.

Beat butter (1 1/2 sticks) and granulated sugar in a large bowl with an electric mixer at medium-high speed until pale and fluffy, 3 to 5 minutes, then add eggs and beat 1 minute. Reduce speed to low and add flour and pumpkin mixtures alternately in batches, beginning and ending with flour mixture and mixing until batter is just smooth.

Spoon batter into pan, smoothing top, then bake until a wooden pick or skewer inserted in center of cake comes out clean, 45 to 50 minutes. Cool cake in pan on a rack 15 minutes, then invert rack over cake and reinvert cake onto rack. Cool 10 minutes more.

Make icing:
While cake is cooling, whisk together buttermilk and confectioners sugar until smooth. Drizzle icing over warm cake, then cool cake completely. Icing will harden slightly.

Ebleskiver


Here I am with my new Ebleskiver pan I scored at an estate sale in St Paul Mn that my fantastic friend Kristen(you'll learn more about her later) and I happened upon last weekend. I've had my eye on one of these bad boys in the Williams Sonoma catalog for some time now. Score! $8 for a vintage Ebleskiver pan. I also picked up a food mill, a vintage Osterizer blender that weighs enough to use as a weapon if you ever need to crack someones skull open in your kitchen(it could happen)What's that? You are looking at my picture and judging me? Yes. This is indeed what I look like on any given weekend when I am lucky enough not to have to leave my house. I will look like this all day and probably worse tomorrow. However my kitchen is full of pumpkin filled treats, homemade soup and soon Ebleskiver once I figure out how the heck to use this pan.

Saturday, October 10, 2009

When life gives you apples, make apple pie.

s
So I'll be honest. I don't make pie. Why? Because rolling dough terrifies me. I don't even bake Christmas cookies that require rolling. Do you have any idea what sort of sick fun I could have decorating gingerbread men and women? I have denied myself this pleasure all because I fear the rolling pin. So today for whatever reason I decided to take another stab at using the ol' rolling pin. And voila! I did it and it was easy! Maybe it was the recipe I used, maybe the last 10 years that have gone by since attempting it I have become more patient maybe it was the second glass of wine that gave me the courage...I don't know. What I do know is that I am going to have some seriously funny gingerbread men and women to share with you in the coming months. Look out!


My First Apple Pie


The dreaded crust...this makes enough for a double crust 9" pie. Though I cut one up and got all fancy and made a lattice top.

1/2 cup shortening
1 1/2 cups all purpose flour
1 tsp sugar
1/2 t salt
1/2 cup very cold water

Mix shortening , flour sugar and salt together with a fork or your fingers until very crumbly. Add as much water as needed to hold together, and mix lightly with a fork. Divide ball of dough in half.

Take a deep breath and roll one ball of the dough gently to about an inch larger than pie plate. Fold carefully in half. Lift to pie plate, and unfold. Fit into pan. Roll second ball of dough and cut into strips and lay over filled lower crust and weave. Good Luck!

For the Apple Pie Filling
1/2 cup unsalted butter
3 tablespoons all-purpose flour
1/2 cup white sugar
1/2 cup packed brown sugar
1/4 cup water
8 Granny Smith or whatever baking apple you have on hand - peeled, cored and sliced

Melt butter in a sauce pan. Stir in flour. Add white sugar, brown sugar and water. Bring to a boil. Reduce temperature, and simmer 5 minutes

Meanwhile, place the bottom crust in your pan. Fill with apples, mounded slightly. Do your magic with the pieces of crust for the lattice top. Carefully pour the sugar and butter mixture over the crust. Pour slowly so that it does not run off. And for crying out loud don't burn yourselves..that stuff is hot.

Bake 15 minutes at 425 degrees then reduce the temperature to 350 degrees , and bake for another 35 to 45 minutes.

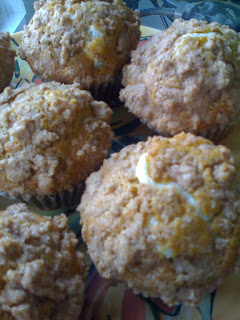
Cream Cheese Filled Pumpkin Muffins


I woke up to snow this morning. I decided quite early that I was going to pretend that outside my home (for me it is my kitchen) there was no world. But then reality set in when my coffee pot decided to quit working. So I was forced to go out into the 29 degree "world" and buy a new one..as long as I was out I went to the farmers market and picked up some fresh tomatoes, a quart of honey and some delicious homemade jellies. Then the grocery store for some canned pumpkin and things I needed to bake some pies, cook some stew and settle in for the weekend. Except for a crazy lady in aisle five at the supermarket I managed to nearly pretend I was all alone in the world.


Cream Cheese Filled Pumpkin Muffins


Yield: 24 muffins
Ingredients:

For the muffins:
3 cups flour
1 tsp. cinnamon
1 tsp. nutmeg
1 tsp. ground cloves
1 tbsp. and 1 tsp. pumpkin pie spice
1 tsp. salt
1 tsp. baking soda
4 eggs
1 ¼ cups vegetable oil
2 cups sugar
2 cups pumpkin puree

For the filling:
8 oz. cream cheese, softened
1 cup powdered sugar

For the streusel topping:
½ cup sugar
¼ cup and 1 tsp. flour
4 tbsp. butter, cubed
1 ½ tsp. cinnamon

Directions:
To prepare the filling, combine the cream cheese and powdered sugar in the bowl of an electric mixer and whip until smooth. Form into a log on plastic wrap or foil, making sure that the diameter is small enough to fit into the well of a muffin pan. Wrap the log up tightly and freeze until slightly hardened, 1-2 hours. I was not patient enough to wait the full 1-2 hours. In fact I waited about 15 minutes. Patience is overrated.

To make the muffins, combine the flour, spices, salt and baking soda in a medium bowl. Mix well and set aside. In the bowl of an electric mixer, combine the eggs, vegetable oil, sugar and pumpkin puree. Mix until well combined. Add in the dry ingredients and mix on low speed until just combined.

To make the streusel topping, combine all ingredients in a small bowl. Mix together with a pastry blender or your fingertips until crumbly.

Preheat the oven to 350°. Line two muffin pans with paper liners. To assemble the muffins, fill each muffin well halfway with batter. Remove the cream cheese log from the freezer and slice into 24 equal slices. Place a slice in each muffin well. Divide the remaining muffin batter evenly among the muffin cups, on top of the cream cheese. Sprinkle the streusel topping over the top of the batter. Bake for 20-25 minutes. Let cool completely before serving...or not.

Saturday, October 3, 2009

Bahama Mama Banana Rum Cake


This recipe comes from my Sticky Chewy Messy Gooey cookbook. I've baked this cake twice. Once for the Ryan Hoff Golf Tournament where it fetched $50 at the dessert auction and once to sell at the coffeehouse where I work. It is rich heavy and delish! And there is enough rum in this bad boy that you could consider eating a slice after lunch an afternoon bump. Enjoy!


Bahama Mama Banana Rum Cake

Dark Rum Glaze:
1/2 cup unsalted butter
1/4 cup water
1/2 dark brown sugar (firmly packed)
1/2 cup granulated sugar
1/2 cup dark rum

Combine the butter, water, and sugars in a heavy bottomed (hey! Like the pan I'm heavy bottomed too!) saucepan over medium high heat and bring to a boil. Immediately turn down the heat to medium low and simmer for 5 minutes. Remove from the eat and stir in the rum. Set aside and keep warm.

Cake:
1 1/2 cups toasted chopped pecans (To toast you can heat them on the stove top in a dry pan or in the oven on a sheet pan until lightly browned and aromatic)
3 sticks of unsalted butter at room temperature
2 cups granulated sugar
1 cup firmly packed dark brown sugar
5 large eggs (room temperature) VERY IMPORTANT
1 cup mashed bananas (very ripe) about 3 bananas
2 tsp pure vanilla extract
3 T dark rum (are feeling tipsy yet? wee!)
3 cups bleached all purpose flour
1 t baking soda
1 t baking powder
1 t salt
3/4 cup sour cream

To make the cake! Preheat your oven to 350 degrees. Position a rack in the middle of the oven. Spray a 10 cup tube pan (angel food cake pan) with non stick cooking spray. Sprinkle the toasted pecans in the bottom of the pan. Set aside.

In a large bowl with an electric mixer set on medium speed beat together the butter and sugars until the light and fluffy. Beat in the eggs one at a time, mixing well after each addition. Beat in the mashed bananas, vanilla, and rum. SIFT the flour, baking soda, baking powder and salt over the batter and fold it in using a rubber scraper, just until no streaks of flour remain. Fold in the sour cream. Spoon the batter over the nuts in the pan and spread to the edge of the pan using the back of the rubber spatula.

Bake until a wooden skewer inserted in the center comes out with no more than a few moist crumbs clinging to it like their lives depend on it. 60 to 80 minutes. Transfer to a wire rack and let cool for 5 more minutes. Poke holes with a wooden skewer all over the cake and pour 1/4 cup of the warm rum glaze all over the cake. Let cool for another 5 minutes. Place a serving platter over the pan and invert to release the cake onto the platter. Spoon the remaining glaze a little at a time and let stand until glaze is completely absorbed into the cake. If the glaze starts to pool at the ase of the cake use a small metal spatula to spread it up the sides of the cake. As the glaze hardens, this will encase the cake in a rummy yummy sugary shell.

LET THE CAKE COOL COMPLETELY before cutting into wedges and serving. And don't drive drunk.

I had to buy a BIG $23 bottle of Meyers rum to make this cake. It's so good you'll make it more than once. But I bet if you're creative you'll find other ways to use the yummy rum!

Thursday, September 24, 2009

Ties For The Animals

Buy a tie and at the same time contribute to a good cause! Check out this fun auction.

http://duluthsuperiormagazine.com/?p=810

Wednesday, September 9, 2009

Sweet and Red Potato Salad


Here is my favorite potato salad recipe. I love it not just for the sweet potatoes but because it's not drowning in mayo. Whenever I serve it people comment on its deliciousness.


Red and Sweet Potato Salad


2 pounds red potatoes, cut into 1 inch chunks
1 pound sweet potato or yam, peeled and cut into 1 inch chunks
1/4 cup red wine vinegar
1 T spicy brown mustard
1 1/4 t salt
1/2 t black pepper
1/2 cup mayo (not miracle whip)
1/4 cup milk
2 celery ribs chopped
1 small red onion chopped
1/3 cup minced fresh parsley

Directions:
1. Place the red potatoes in a large saucepan and cover with water; bring to a boil. Reduce heat, cover and cook for 2 minutes. Add sweet potatoes; return to a boil. Reduce heat, cover and cook for 8-10 minutes. Check after 6 minutes. You don't want mushy potatoes, just cooked to the point a fork will pierce with ease. We aren't mashing these folks!

2. In a large bowl whisk the vinegar, mustard, salt and pepper. Drain the cooked potatoes; add to vinegar mixture and toss gently to coat. Cool.

3. In a small bowl combine mayo and milk. Stir in the celery, onion and parsley. Gently stir into cooled potato mixture. Serve immediately or cover and chill and serve cold.

Monday, September 7, 2009

Mother

This is my very pretty mother. I'm wishing she was not sick in the hospital and would be able to enjoy the beautiful weekends weather, her family here from Sweden and my sister Chris home from Seattle. She is a remarkable woman and remarkably strong. I love her and wish she would feel better soon.

Sunday, September 6, 2009

It's Official. Best Brownie EVER!


I don't like brownies that are kinda sorta like cake. I don't want them frosted either. I like them to kinda sorta be like fudge. And this recipe is exactly the brownie I have been looking for. These are serious as a heart attack good and the salt that is swirled in at the end. Well, you'll just have to make these to understand.


Salt Swirled Fudge Brownies

1 1/2 sticks unsalted butter, cut into pieces

2 ounces unsweetened chocolate, chopped

1/4 c. plus 2 Tbsp. unsweetened cocoa

2 cups sugar

3 large eggs

1 1/2 tsp. pure vanilla extract

1 cup flour

1/2 tsp. sea salt (do not substitute plain salt) It must be sea salt.

Preheat oven to 350 degrees and line a 9″ square baking pan with foil. Butter or spray with cooking spray and set aside.

In a large saucepan, melt the butter with the unsweetened chocolate over very low heat, stirring occasionally. Remove from the heat. Whisking them in one at a time until thoroughly incorporated, add the cocoa, sugar, eggs, vanilla and flour. Pour the batter into the prepared pan and smooth the surface. Sprinkle the salt evenly over the batter. Using a butter knife, swirl the salt into the batter.

Bake the fudge brownies in the center of the oven for about 35 minutes, until the edge is set but the center is still a bit soft and a toothpick inserted into the center comes out coated with a little of the batter. Let the brownies cool at room temperature in the pan for 1 hour, then refrigerate just until they are firm, about 1 hour. Lift the brownies from the pan and peel off the foil. Cut the brownies into 16 squares. Serve at room temperature.

Ta Da Ta Da!

Not bad considering 1/2 the batter ended up on the bottom of my oven. I'll let you all know how it tastes!

Ta Da!

So after a 1/2 hour of cleaning the racks and the bottom of the oven I did end up with two lovely coconut cakes.

Size Does Matter


At least it does when it comes to cake pans apparently. I decided to finally give Ina Garten's Coconut Cake recipe a whirl. I have been meaning to for quite some time and with a big family picnic tomorrow I need several desserts. The cake was easy to throw together and as soon as I poured it into my two 8" cake pans instead of 9" cake pans as directed I knew I was in trouble. Did I take batter out? Nope...Just went for it. Oops! It all turned out in the end though. I'll post the cake recipe later today. I have a Banana Rum Cake to finish and my Nectarine Tart. Heres the recipe for this little gem.

Don't forget to use the right size pans...however it was fun to share this last night with my facebook friends for a good laugh.


Coconut Cake

Ingredients

  • 3/4 pound (3 sticks) unsalted butter, at room temperature, plus more for greasing the pans
  • 2 cups sugar
  • 5 extra-large eggs, at room temperature
  • 1 1/2 teaspoons pure vanilla extract
  • 1 1/2 teaspoons pure almond extract
  • 3 cups all-purpose flour, plus more for dusting the pans
  • 1 teaspoon baking powder
  • 1/2 teaspoon baking soda
  • 1/2 teaspoon kosher salt
  • 1 cup milk
  • 4 ounces sweetened shredded coconut

For the frosting:

  • 1 pound cream cheese, at room temperature
  • 1/2 pound (2 sticks) unsalted butter, at room temperature
  • 3/4 teaspoon pure vanilla extract
  • 1/4 teaspoon pure almond extract
  • 1 pound confectioners' sugar, sifted
  • 6 ounces sweetened shredded coconut

Directions

Preheat the oven to 350 degrees F. Grease 2 (9-inch) round cake pans, then line them parchment paper. Grease them again and dust lightly with flour. ( 9 inch pans are definitely what I recommend using) hehehehe.

In the bowl of an electric mixer fitted with a paddle attachment, cream the butter and sugar on medium-high speed for 3 to 5 minutes, until light yellow and fluffy. Crack the eggs into a small bowl. With the mixer on medium speed, add the eggs 1 at a time, scraping down the bowl once during mixing. Add the vanilla and almond extracts and mix well. The mixture might look curdled; don't be worried about that. It's not a problem.

In a separate bowl, sift together the flour, baking powder, baking soda and salt. With the mixer on low speed, alternately add the dry ingredients and the milk to the batter in 3 parts, beginning and ending with dry ingredients. Mix until just combined. Fold in the 4 ounces of coconut with a rubber spatula.

Pour the batter evenly into the 2 pans and smooth the top with a knife. Bake in the center of the oven for 45 to 55 minutes, until the tops are browned and a cake tester comes out clean. Cool on a baking rack for 30 minutes, then turn the cakes out onto a baking rack to finish cooling. I have a convection oven so mine baked much faster than the 45 minutes. So watch them!

For the frosting, in the bowl of an electric mixer fitted with a paddle attachment, combine the cream cheese, butter, vanilla and almond extract on low speed. Add the confectioners' sugar and mix until just smooth (don't whip!).

To assemble, place 1 layer on a flat serving plate, top side down, and spread with frosting. Place the second layer on top, top side up, and frost the top and sides. To decorate the cake, sprinkle the top with coconut and lightly press more coconut onto the sides. Serve!

Wednesday, September 2, 2009


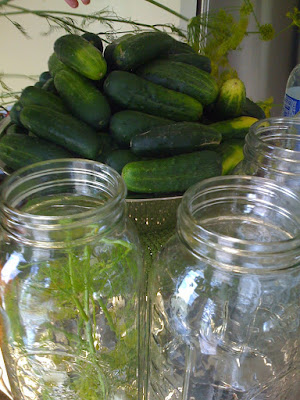
I felt like the Pickle Queen with my beautiful bouquet of Dill.
This is my sister Chris. She typically makes 75 1/2 gallon jars of pickles a year. She usually sends them from Seattle to us as gifts. She is here visiting so that is why we decided to do the pickling here and save her the trouble and expense of mailing them.

Pickling Predicament


Who would have guessed that putting up a couple dozen jars of dill pickles would take a small miracle and frustrating, exhausting search for fresh vine ripened cucumbers and half gallon wide mouth canning jars. I had to travel to Cloquet to get the 6 jars they had in stock.

Apparently my sister Chris visiting from Seattle who is a self admitted food and wine snob is also a pretty tough cucumber critic, of the 120 pounds of pickling cucumbers I acquired through a shall remain nameless food distributor only 15 pounds were pickle worthy. They must be blemish free, not unlike our mates and not torpedo shaped lest it yield overly seedy pickles. So says Chris.

When we fell so far short of pickles I made a frantic call to a farmer I know and I was able to get about 10 pounds of freshly picked gherkins. My good friend Dean was kind enough to pick them up and run them out. He has been my go to guy for all things emergency for quite some time. He's the best!

I must admit I thought pickling was going to be a very difficult and tiresome job. I couldn't have been more wrong. In the time it took for my sister and I to drink a lovely bottle of Cabernet the first batch was totally processed. Fabulous!

At this point I have no idea what went into making these pickles except damn near a full tank of gas, visits to three cities and at least 6 stores looking for jars and cucumbers that measured up to my sisters impossibly high cucumber expectations. All in all a very good first pickling experience!

Monday, August 31, 2009

Half Awake Ramblings


So I woke up at 3:56 a.m. this morning thinking about the photo I snatched of the Baked Apple Pancake recipe I made yesterday morning. Was it OK that I did that? Well as it turns out not so much. The Baked Apple Pancake was long in mine and Eric's bellies when I decided I was going to write about my yummy breakfast. So I've pulled down the picture of the dish and replaced it with a photo of an apple from my tree. I will make a point to remember to take pictures of the food I make before I dive in to it from now on.

I've noticed from other blogs I've visited followers want to know what sort of camera is used in the photography of food. Well friends, my photos are coming from my iPhone. My real camera saw it's end at a Green Bay Packer vs Dallas Cowboy game last fall. It was the camera or the experience of an icy cold Leinenkugel's at Lambeau Field and well, you know where this is going.

Sunday, August 30, 2009

Pears and Apples


I did not plant a garden this year. I am simply not good at it. There are many reasons I fail so miserably as a gardener. First of all if it gets over 75 degrees outside I need to be a) in a lake or b) somewhere with air conditioning. If it's not the heat, I can blame the mosquito's and flies for my dislike of the outdoors in summer. I won't even bore you with my life long issue of starting things and never finishing them. It's not popular to admit you do not like summer. Most people will think you are crazy, especially considering we get so little of it here in Northwestern Wisconsin. Give me that perfect 65 degree day and you will find me happily outside. All of this makes for a very unsuccessful gardener. I do however have some fruit trees that I can count on that don't require my attention. Nothing is required of me but patience for the fruit to appear and ripen. If only gardens were so easy going! So what to do with the lovely apples and pears I will soon be able to harvest? A pear and apple crisp? Perhaps a gratin or a rustic salad. I have a few more weeks to think about it. Besides..it's 65 degrees and sunny. I'm going outside.

Something New For Breakfast


A typical Sunday morning for me is waking up early, checking my email, hopping on facebook to see what shenanigans my friends have been up to, getting my coffee and then settling into my favorite chair and perusing food blogs. I have some favorites but every day find new blogs with wonderful recipes and interesting people writing them. Today I ran across a recipe that looked easy and delicious and I had one apple in the fruit bowl. Perfect.


Baked Apple Pancake

Ingredients:
1 large apple (or 2 small), peeled and sliced
2 TBS white sugar
1/4 tsp cinnamon

2 eggs
1/2 C milk
1/2 C flour
1/2 tsp cinnamon
2 TBS brown sugar
1 TBS butter, cubed


Preheat over to 400F and grease a 9 in. pie pan (or cast iron skillet). In a medium size bowl mix apple slices with sugar and cinnamon and lay in a single layer in the greased pan.

In the same bowl, blend together the eggs, milk, and cinnamon. Add the flour a little at a time, mixing with a whisk as you go. Pour batter over the apple slices and sprinkle the top with the butter cubes and brown sugar.

Bake for 25 minutes. Best enjoyed with bacon a cup of coffee and in a comfortable chair whilst still wearing your pajamas.